
Vision Board
While other tabs help you manage short-term tasks (Hand), your complete backlog (Decks), and mid-term planning (Timeline), the Vision Board gives you the ultimate high-level, “bird’s-eye view” of your entire project.
Vision Boards are Codecks’ interpretation of whiteboards, designed to bridge the gap between freeform ideation and structured project management. You can use them for quick brainstorming, creating mood boards, or crafting detailed documentation. But their real power lies in their ability to connect with your live project data, allowing you to build powerful dashboards.
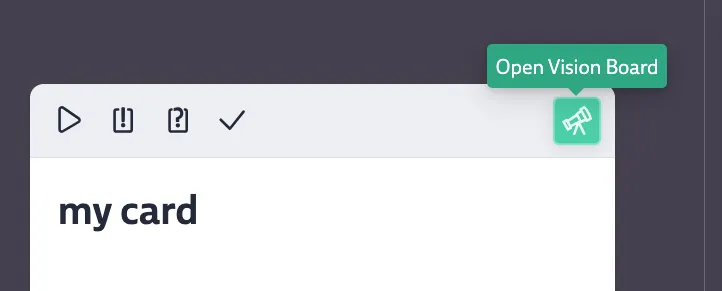
You can create a Vision Board on any opened Card using the telescope button. Changes to Vision Boards are tracked in your project’s activity log.
Scope
Vision Boards are attached to individual Cards. This means access rules for a Vision Board are inherited from its underlying card. For instance, a Vision Board on a private Ghost Card can only be seen by you, and project access restrictions apply as well.
For more organization-wide Vision Boards, you can use the bookmark feature on the underlying card or create a dedicated Deck for Cards that hold important Vision Boards.
You can navigate all available Vision Boards via the Vision Board picker at the top left of the screen. The picker shows the last board you opened and provides a list of all others you have access to, named after the titles of their underlying Cards. The card button next to the picker opens the underlying card in a sidebar so you can inspect or edit it without leaving the board. The Vision Board tab in the main header will always take you to the last board you had open.
Whiteboard Functionality
At its core, the Vision Board is an infinite canvas for your ideas. You and your team can collaborate in real-time to work with the following nodes:
Node Types
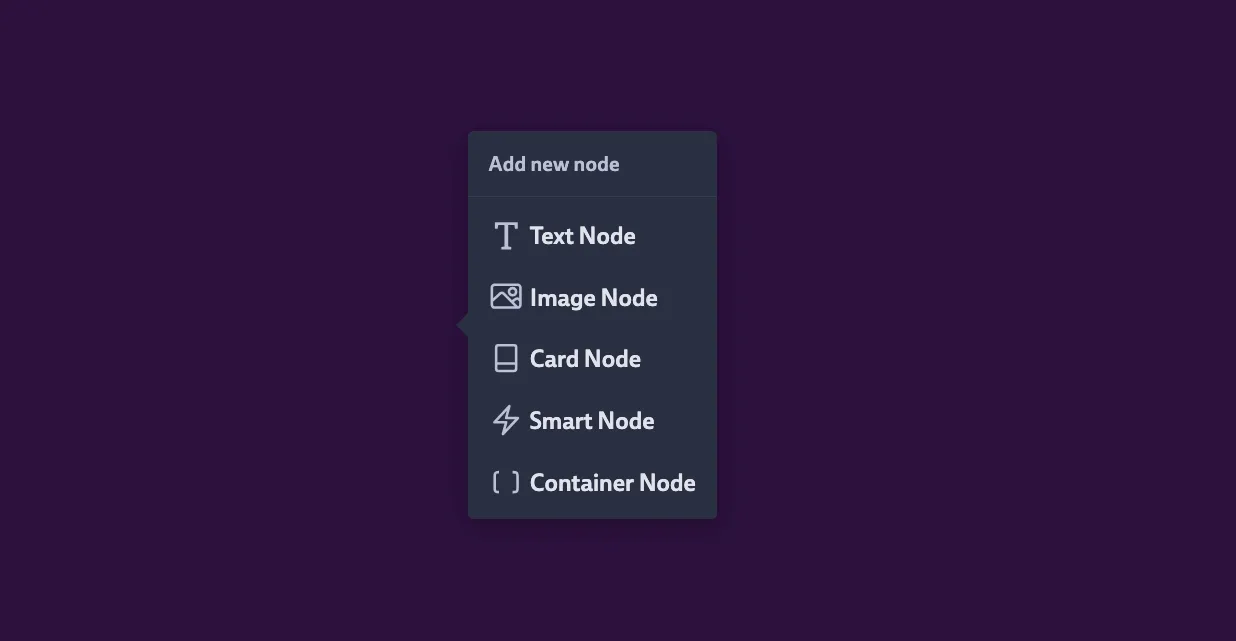
Text Node
You can use this for anything from small labels to rich, detailed documents. Text nodes have a solid background for readability and support full Markdown formatting, including Codecks-specific extensions like referencing Cards with $, decks with $$, and users with @. You can paste images directly into text nodes, and checklists work just like they do in card descriptions.
Image Node
This node allows you to upload an image directly to the Vision Board. For a faster workflow, you may also paste an image from your clipboard or drop a file straight onto the canvas to add it. Image nodes can also have a text label.
Video Node
You can embed YouTube videos directly on the board. This is useful for reference footage, trailers, or tutorial videos that your team needs quick access to. Pasting a YouTube URL onto the canvas creates a video node automatically.
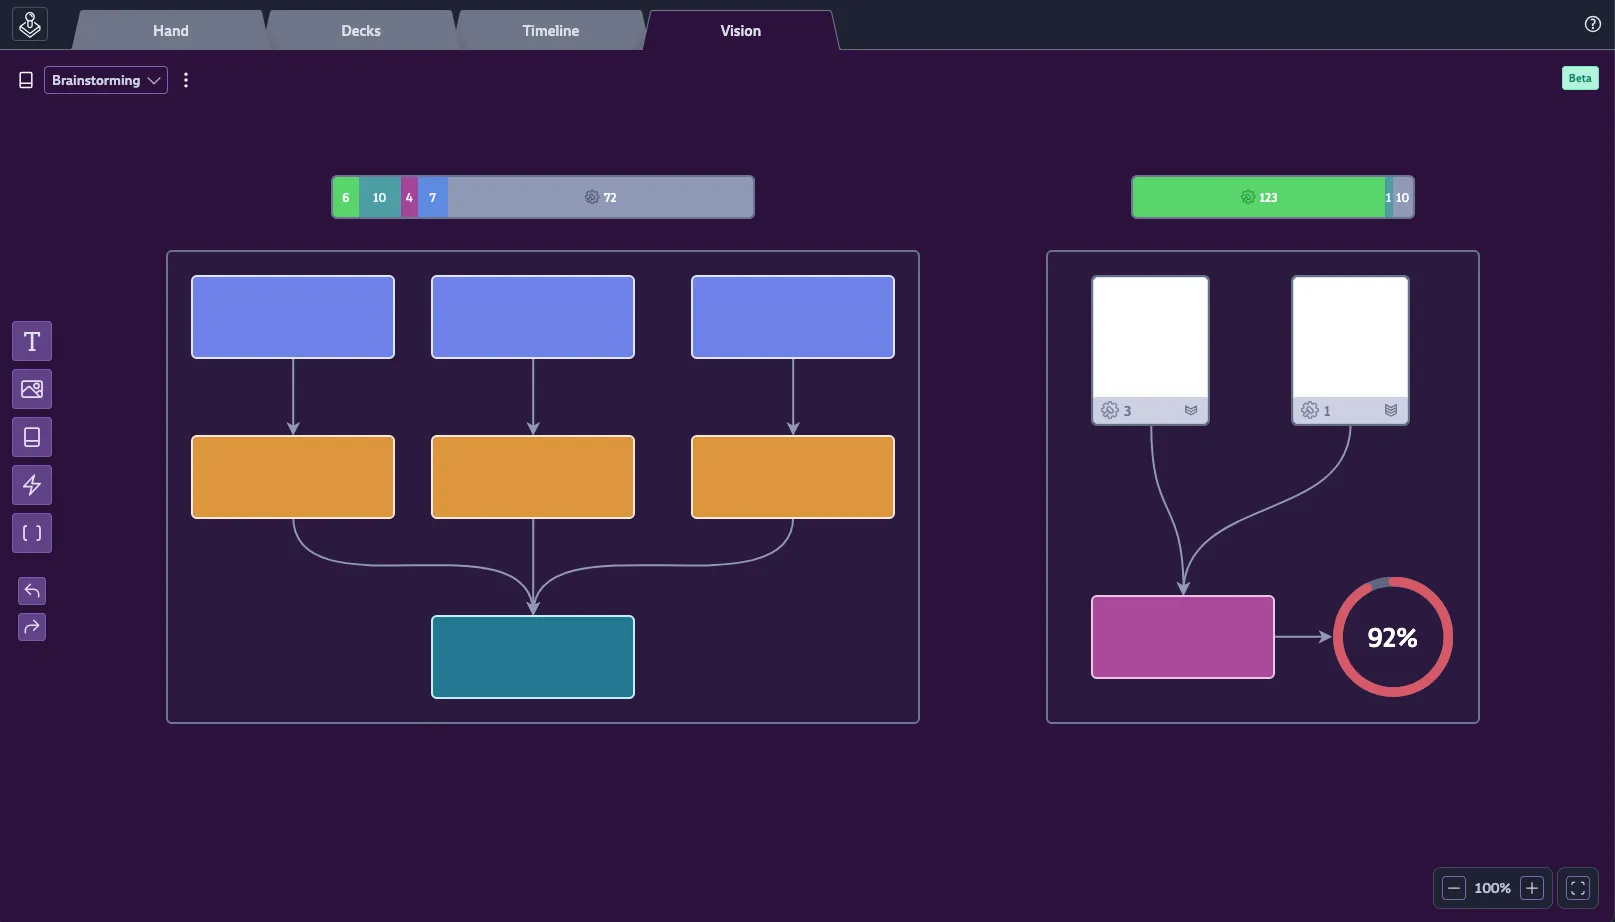
Card Node
You can either search for any existing Card and add it to the Vision Board, or create a new one. Card nodes have three display modes:
- Card Lane – a compact, single-line view.
- Mini Card – the standard mini-card view.
- Full Card – the full card with description, comments, and properties inline on the board.
Clicking on a Card node opens it in a sidebar so you can inspect and modify it directly from the board.
Smart Node
This is a Pro feature that lets you create dynamic, data-driven widgets. You define which Cards a Smart Node represents in one of two ways:
- Write a query to find Cards based on specific criteria, such as “all Cards with high priority in Deck X,” “all Cards assigned to User Y,” or “all Sub Cards of Hero Card Z.”
- Manually add specific Cards to the node by using the plus button on the search results.
Once the Cards are defined, you can visualize them in several ways:
- Progress Bar breaks down the Cards by their workflow state (Not Started, Started, Snoozing, Blocked, Review, Done). A simple variant shows only the Done portion.
- Horizontal Bar and Vertical Bar charts visualize the same workflow breakdown stretched along an axis. Useful as labelled status bars inside a larger composition.
- Donut Chart (also called Pie Chart) shows the same breakdown radially. You can drop a cover image into the centre and choose between a simple “done vs. open” arc or a segmented one.
- Number Widget displays a single big number: either the remaining card count or the remaining effort.
- Table View shows all matching Cards as rows. You can customize the columns (priority, effort, owner, Run, milestone, checklist progress, deck, upvotes), pick a sort order and direction, and choose whether to hide archived Cards. Inside the table you can select multiple Cards with the checkbox in each row to reveal the standard bulk action toolbar, and use
j/kto step through cards once one is opened in the sidebar.
Effort-based charts (Bar, Donut, Number) use effort values; a configurable fallback effort is used for Cards without one. Smart Nodes automatically generate a label from the filter, which you can override.
Configuring a Smart Node opens a dedicated panel in the left sidebar where you can edit the query, switch the visualization, and tweak its options without leaving the board.
Container Node
Containers allow you to visually and logically group other nodes. They can be nested, with sub-containers inside parent containers. Any node that is fully enclosed within a container’s boundaries will automatically belong to it, so resizing or moving a container will “capture” other nodes. The easiest way to add nodes to a container is to drag them directly into it. You can also select multiple nodes at once and use the context menu to create a new container around them. Containers can be given a custom label.
Shared Functionality
- Colors: All nodes can be set to a neutral default or one of six accent colors (green, blue, pink, red, brown, yellow).
- Arrows: You can draw arrows between any nodes or containers to show relationships. Arrows can also have a color and a label.
- Clipboard: Standard cut, copy and paste are supported, including pasting nodes between different Vision Boards.
- Duplicate: Quickly duplicate any selected node(s) with
ctrl/cmd + d. - Delete: Remove selected node(s) using
backspace. - Undo/Redo: Correct mistakes easily using the buttons on the left or with the standard
ctrl/cmd + z(undo) andctrl/cmd + shift + zorctrl/cmd + y(redo) shortcuts.
Adding Nodes
You can add new nodes to the canvas in several ways:
- Click a node-type button on the toolbar to arm the cursor with that node, then click anywhere on the canvas to place it. A dashed placeholder follows the cursor while you aim. Press
Escto cancel. - Drag a node-type button directly onto the canvas and drop it where you want the node placed.
- Double-click anywhere on an empty part of the canvas to open the node picker at that spot. Use arrow keys to navigate the picker.
- Draw an arrow from an existing node into an empty section of the canvas to create a node anchored to that arrow.
- Paste text from your clipboard onto the canvas to create a text node. If the pasted text is a YouTube URL, a video node is created instead.
- Drop image files onto the canvas to create image nodes, or paste images from the clipboard.
Navigating on the Canvas
- Touchpad: Use a two-finger scroll to pan the canvas. Pinch to zoom.
- Mouse: Use the mouse wheel to zoom in and out. Right-click or middle-click and drag to pan the canvas.
- Keyboard + Mouse: Hold
spaceand left-click and drag to pan. - Zoom Controls: Manage and reset the zoom level using the controls at the bottom right of the screen.
- Zoom Lock: When using a mouse, you can press
zto toggle Zoom Lock. With Zoom Lock active, the wheel scrolls the canvas content instead of zooming, and you need to holdctrl/cmdto zoom.
Multiplayer and Sync
Vision Boards are fully collaborative. You can see your teammates’ cursors moving on the canvas in real-time, and any elements they have selected are highlighted with their color. Note that changes inside a text node are not shown in real-time and only become visible once the editing user saves them.
A small status indicator in the top right of the canvas shows whether you’re currently connected to the server. If you lose connection, you can keep editing — your changes are stored locally and synced automatically the next time you reconnect. If the automatic sync runs into trouble, an “Attempt Sync” button appears so you can retry on demand.
Access and Lock States
Whether you can edit a board is determined first by your permissions on the underlying Card, and then by the board’s own lock state. The creator of a board and any admin can change its state from the ”…” menu next to the Vision Board picker:
- Editable — Anyone with access may edit. This is the default.
- Read Only — Only the creator may edit; everyone else sees a read-only view.
- Locked — No one may edit, including the creator. Switch back to Editable to make changes again.
Deleting a board is also done from the ”…” menu and requires creator or admin rights.
Vision Boards on Open Decks
If you publish a project via Open Decks, you can pick a Vision Board to be shown as the project’s landing page instead of the deck overview. Configure this under Project Settings → Open Decks → Vision Board. Only Vision Boards whose underlying Card lives in the published project are eligible. Visitors see a read-only version of the board and can drill into any Cards that are part of the project.