
Milestones
Milestones are important due dates for your projects. These may be public release dates or publisher deliverable deadlines. If you’re looking for sprints, have a look at the Runs feature.
The Timeline tab is one of the three main views in Codecks and home to everything that relates to attaching associating tasks with dates. Each card can be assigned to one Milestone. The Milestone view allows you to see all cards belonging to that Milestone independent of which project, deck or workflow state they are currently in.
Timeline View
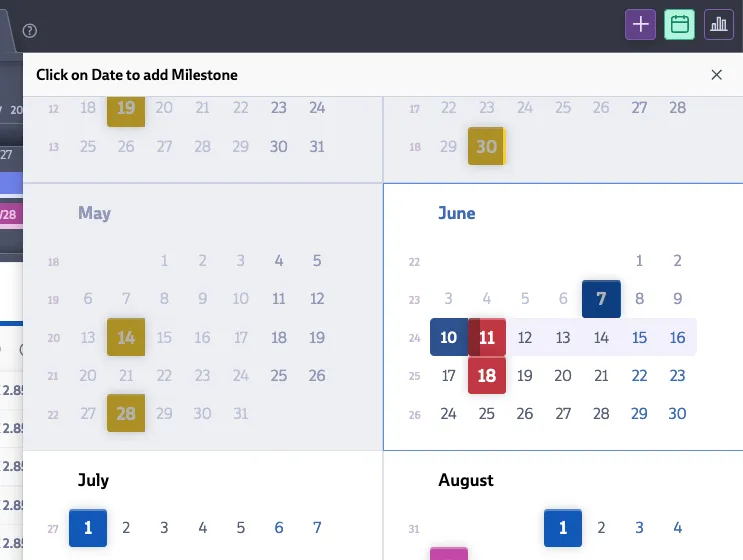
To open the Timeline view clicking on the “Timeline’ tab in the header or press Shift + 3 on your keyboard. To create a Milestone, open the Calendar via the button at the top right of the screen. On the calendar, select the preferred date and enter the new Milestone data.
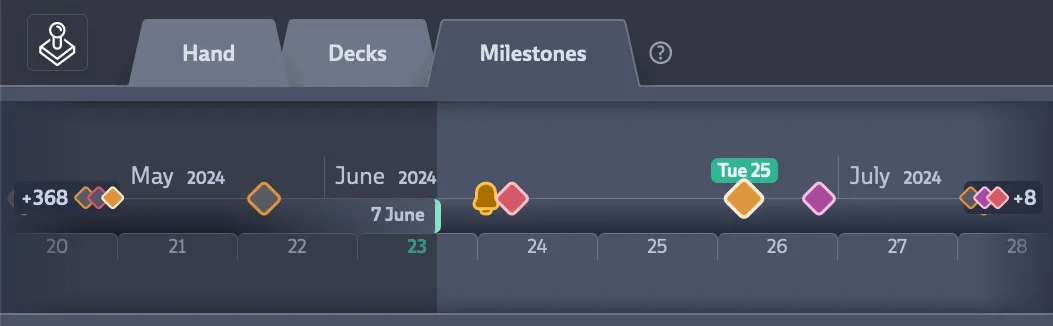
The Timeline view provides an overview of projects’ progress via showing Milestones, Runs and due dates. You can use either mouse wheel or drag and drop to move the timeline.
Features of a Milestone
- Title: The name of the new Milestone. We recommend keeping it short. On some UI elements only the first four letters of the Milestone name are displayed.
- Date: For when this Milestone is due
- Color: The color in which this Milestone is shown throughout the app.
- Project-specific Milestone: If left unchecked the Milestone will be a global Milestone that is always shown. If you make it project-specific, it will only be shown on the timeline if the associated project is currently visible as well. This mechanism can also be used to hide certain Milestones from team members that don’t have access to the respective project.
To delete a Milestone, you can click on the bin icon in the Milestone header bar. Doing this won’t delete the cards, but unassign all the cards from the deleted Milestone. If the Milestone still contains undone cards, you will get a warning informing you about the number of cards this deletion will affect.
Milestone Description, Statistics & User Capacity
Once a Milestone is opened, you can click on the i button below the Add Card button on the left. This will show you the description box as well as statistics about the Milestone including a burndown chart. The description area allows you to update the description and upload a cover image. This image will also be used for the Milestone tooltip.
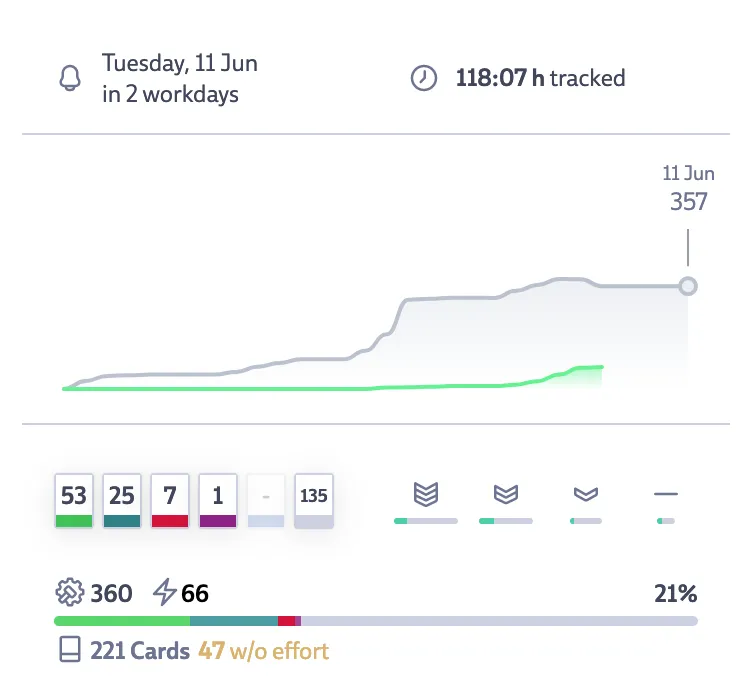
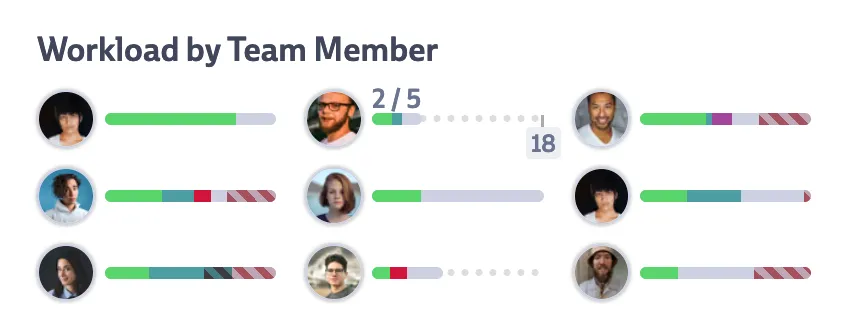
This view also includes Capacity Tracking. It shows how work is distributed across your team mates. You can set the individual capacity of each team member to see who might be overbooked or out of work. Look for the ⚙️ icon at the top right to set and modify the capacity for each user.
If a user is overbooked, the line chart will show striped overlay. If a member still has capacity left, it will be represented with dots. Users are sorted by the percentage of work done (based on work assigned, not capacity).
The Milestone header also shows your personal capacity vs work load at a quick glance.
Calendar View and Milestone Overview
The Calendar button at the very top right of the screen allows you to open the Calendar.
The Calendar View allows you to get a high level overview of your Milestones. You can click on any date to create a new Milestone and use drag and drop to move them around. Ctrl/Cmd+click will open the Milestone in inspector view behind.
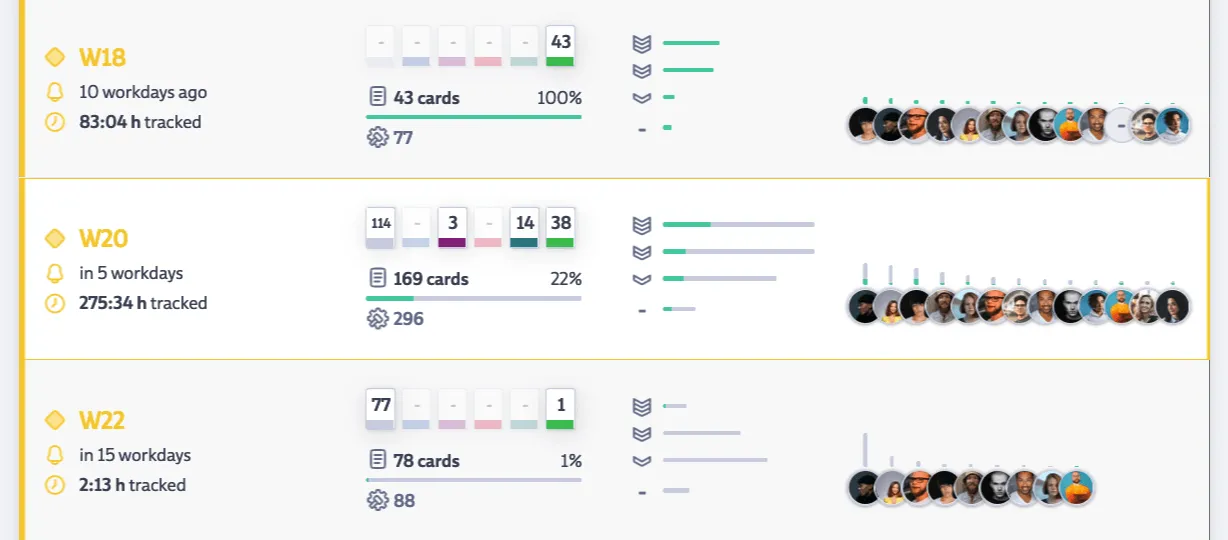
Next to the Calendar Butto you can find “Show Overview” button allowing you to view metrics for each of the Milestones.
The data includes the amount of time tracked, the workflow state of the cards as well as an overview over the priority and owner distribution including their completion rate. The length of these bars use are based on the same unit to allow comparisions accross Milestones.
Assigning Milestones to Cards
You can assign a Milestone to a card in various ways:
- Open the card properties by clicking the properties button on the top right side of an opened card, you can find the Milestone picker below the priority and effort properties. Click the Pick button to allow chosing upcoming and past Milestones.
- Select multiple cards and use the bulk action Milestone button to assign multiple cards to the same Milestone.
- Order your cards by Milestones to easily drag cards between different Milestone lanes.
- Use the Quick Settings.
There can only be one Milestone assigned to a card. To distribute a task over multiple Milestones you can consider using hero cards.
Working with Milestones
Milestone Icons
Cards with Milestones will show a small Milestone diamond icon. Hover over the icon to see more information about the current completion progress and the due date.
Future Milestones will be filled, whereas past Milestones will only have an outline.
Pinned Milestone
The top bar of the Milestone inspector includes a pin icon 📌. Pinning a Milestone allows you to quickly move cards between it and your hand without having to leave the hand view.